Amazon SNS for bounces / complaints / deliveries
MailGun webhooks
After testing click on the "Add Webhook" green button and add 3 webhooks for these event types:
SendGrid webhooks
MailJet webhooks If you use MailJet SMTP then you can set-up Webhooks in your MailJet panel and receive notifications for these two events: bounces and spam-report.
Add these custom headers to your MailJet smtp server:
X-Mailjet-Campaign=>[camp_id];
X-MJ-CustomID=>[sub_id];
Smtp.com
In order to process bounces, complaints, deliveries when using Amazon SES (smtp or api) you must set-up Amazon simple notification services (SNS).
- Copy your endpoint URL: https://www.yoursite.tld/admin/_amazonsns.php?ApiKey
ApiKey is your administrator api key that you can copy from Menu > Configuration > Administrator.
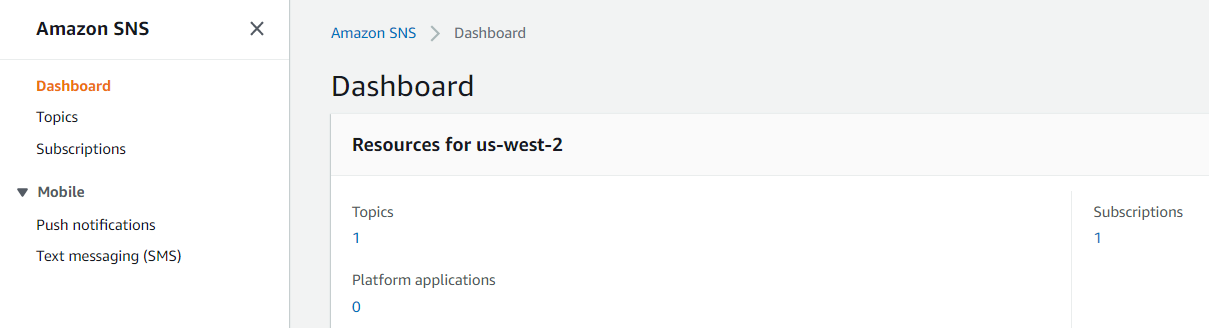
Replace https://www.yoursite.tld with your own installation URL. - Log in to https://console.aws.amazon.com/ with your credentials. Then search for the SNS service. You will see this screen:
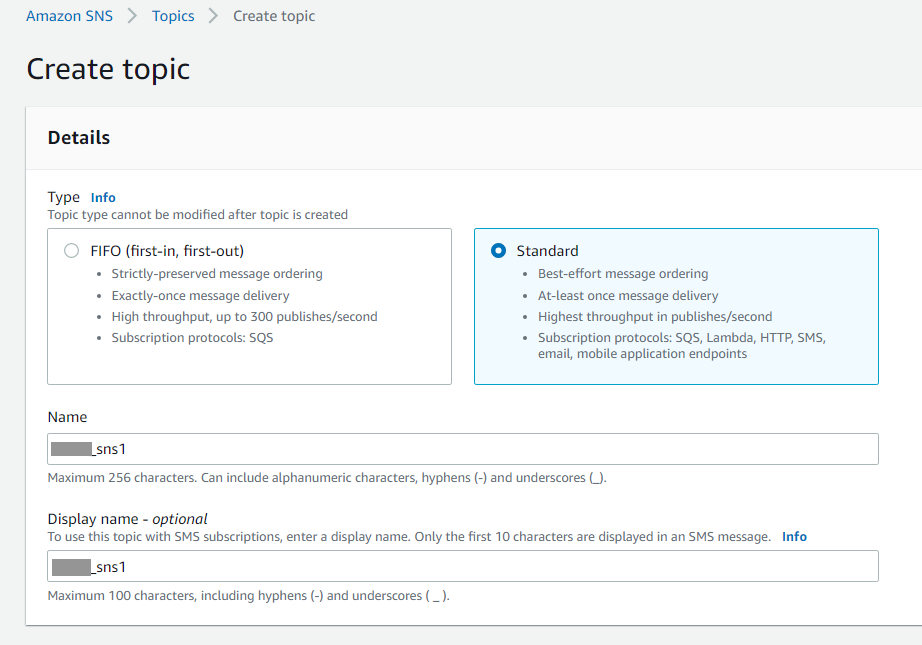
Click on Topics at the left side menu and then click the orange button at the right side Create topic.
-
Create a "Standard" Topic
Under Details enter a name for this topic. Leave all the rest as-is and click the orange button Create topic at the bottom of this screen.
-
Create a subscription for this topic
As soon as you create your topic you will see this screen:
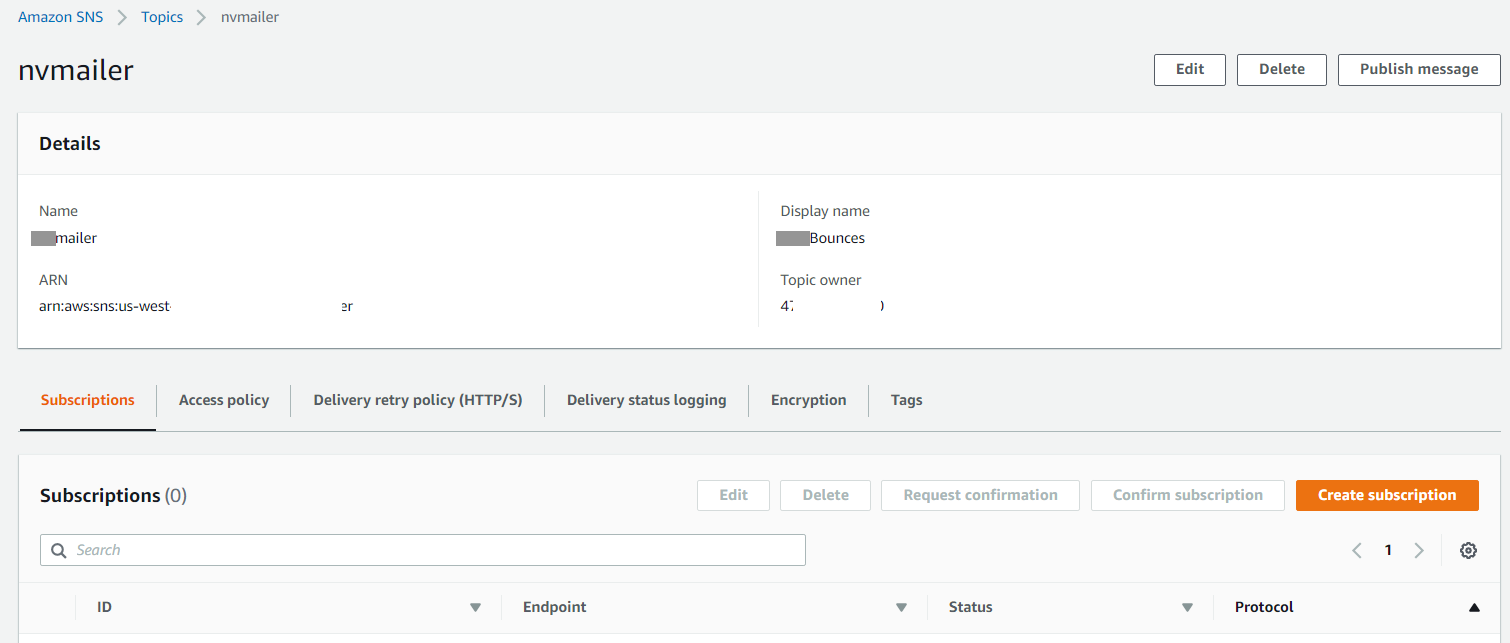
Click the Subscriptions tab and then the orange button Create subscription. This is where you will enter your endpoint.
Choose either HTTP or HTTPS depending on your installation.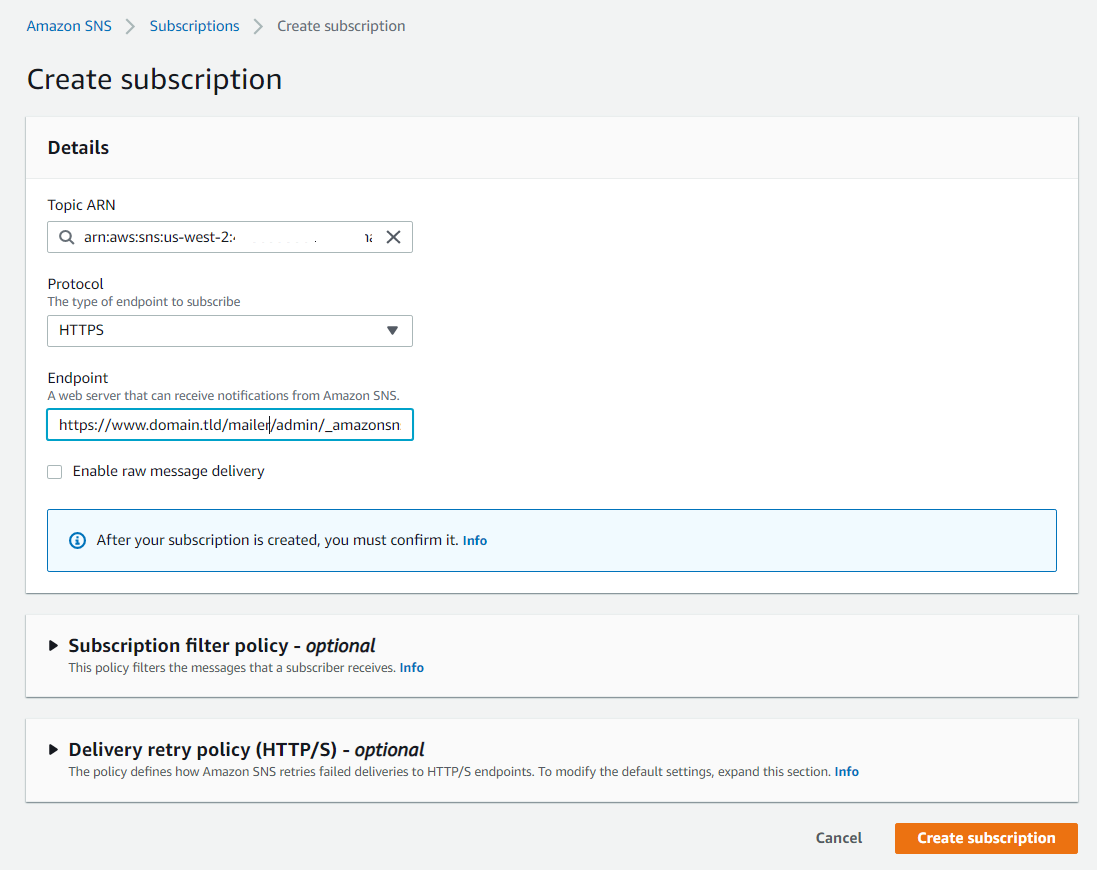
Click the orange button Create subscription at the bottom of the screen to save it. - The subscription will initially appear as Pending verification.
The system will auto approve it and change it to Confirmed.It may take a while.
On the left side menu click Subscriptions to see it: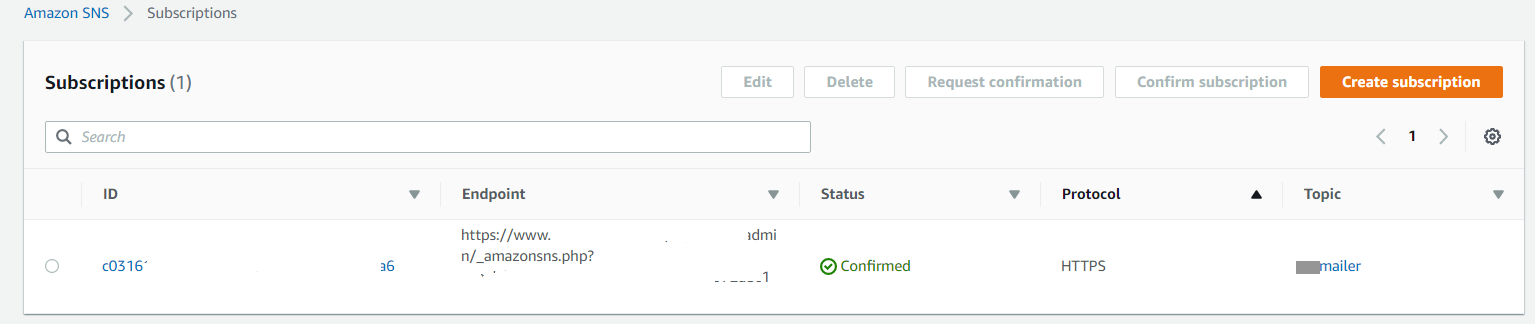
If confirmation is taking longer check your log file to see if something went wrong with your endpoint: Menu > Campaigns > Activity log.
In case you correct something and make changes click on the "Request Confirmation" button. - Now go to the Amazon SES service.
You will create Notifications for the domain but also for the individual email accounts that you have added and verified.
At the left side panel under Configuration click on Verified identities. Then click on each identity whether that is a domain or email address.
Then click the Notifications tab.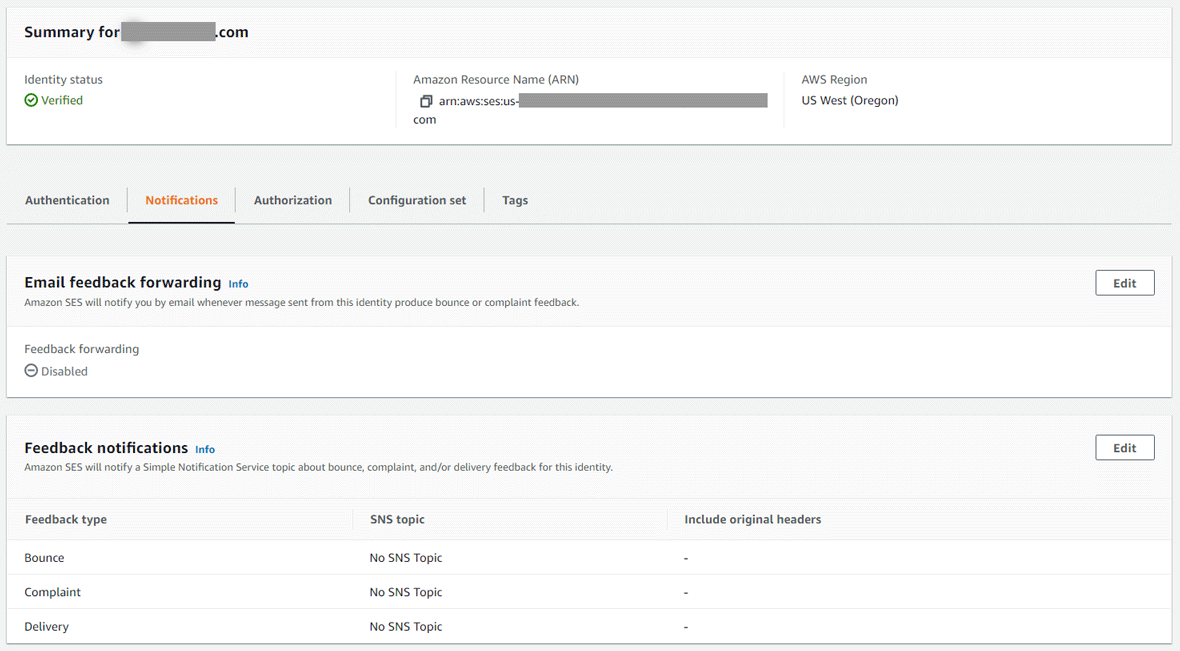
Click “Edit” in "Feedback notifications" section. From the drop down menus select the SNS topic you created earlier.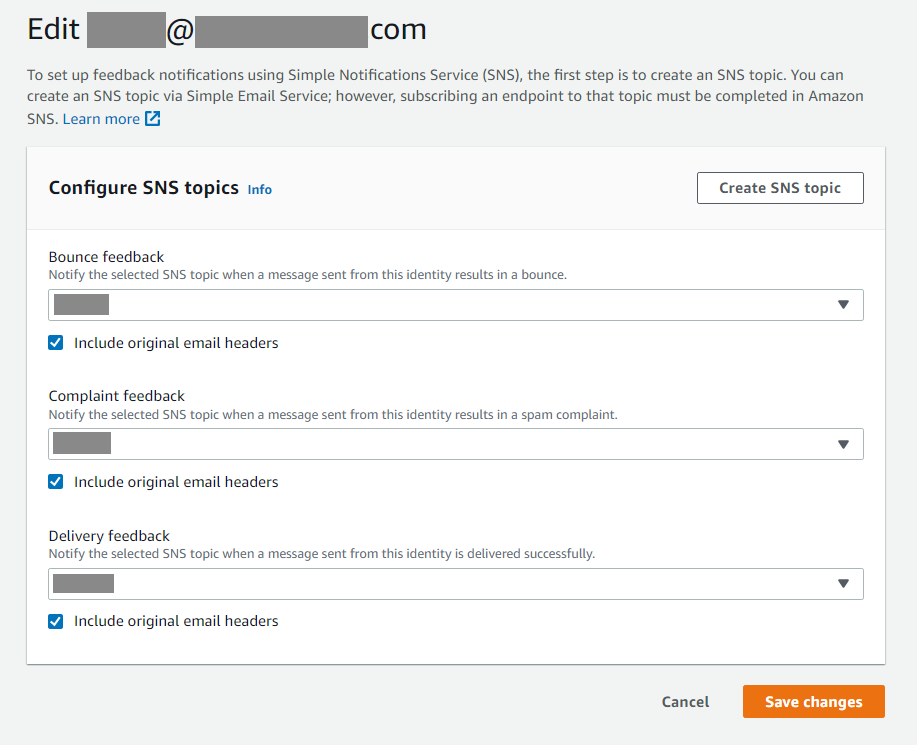
- Repeat step 6 for each of your Amazon verified email accounts.
-
Test your integration
Create a new list and add these email accounts:
bounce@simulator.amazonses.com
complaint@simulator.amazonses.com
Send a campaign to this list. Then look at your campaign report: The Hard bounces rate is based on the Total sent (dispatched) and the Complaints rate is based on the Delivered.
MailGun webhooks
If you use the MailGun SMTP method add this custom smtp header to your MailGun smtp server:
X-Mailgun-Variables=> {"recipient_id": "[sub_id]", "campaign_id": "[camp_id]"};
X-Mailgun-Variables=> {"recipient_id": "[sub_id]", "campaign_id": "[camp_id]"};
The following applies to both SMTP and API methods.
Prepare your Webhook URL. This is:
https://www.yoursite.tld/admin/_mailGunWH.php?ApiKey
ApiKey is your administrator api key that you can copy from Menu > Configuration > Administrator.
Replace https://www.yoursite.tld with your own installation URL.
Inside your MailGun panel click on "Sending" and then on "Webhooks".
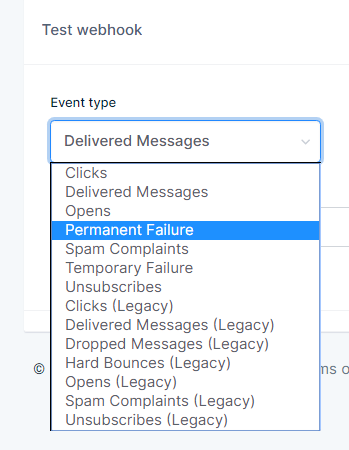
First test your URL. Choose "Event type" Permanent failure. You will know if it worked. At the same time log in your evoMailer and go Menu > Campaigns > Activity log. If your api key was wrong you will see it here.
https://www.yoursite.tld/admin/_mailGunWH.php?ApiKey
ApiKey is your administrator api key that you can copy from Menu > Configuration > Administrator.
Replace https://www.yoursite.tld with your own installation URL.
Inside your MailGun panel click on "Sending" and then on "Webhooks".
First test your URL. Choose "Event type" Permanent failure. You will know if it worked. At the same time log in your evoMailer and go Menu > Campaigns > Activity log. If your api key was wrong you will see it here.
After testing click on the "Add Webhook" green button and add 3 webhooks for these event types:
- Delivered messages (new since v.9)
- Permanent Failure
- Spam Complaints
- Temporary failure (optionally - do not add it if you see that your are getting too many notifications that do not result in hard bounces)
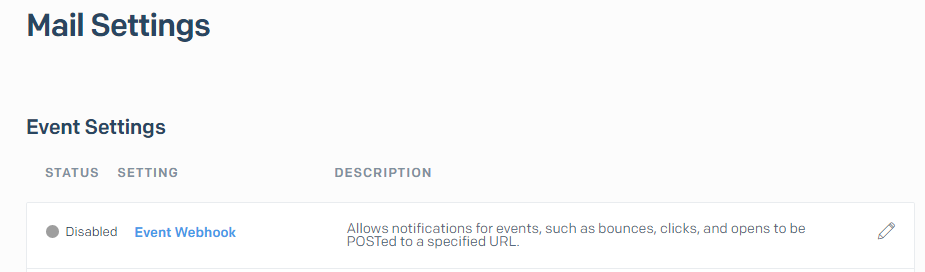
SendGrid webhooks
If you use the SendGrid SMTP method add this custom smtp header to your
SendGrid smtp server:
X-SMTPAPI=> {"unique_args":{"recipient_id":"[sub_id]","campaign_id":"[camp_id]"}};
X-SMTPAPI=> {"unique_args":{"recipient_id":"[sub_id]","campaign_id":"[camp_id]"}};
The following applies to both SMTP and API methods.
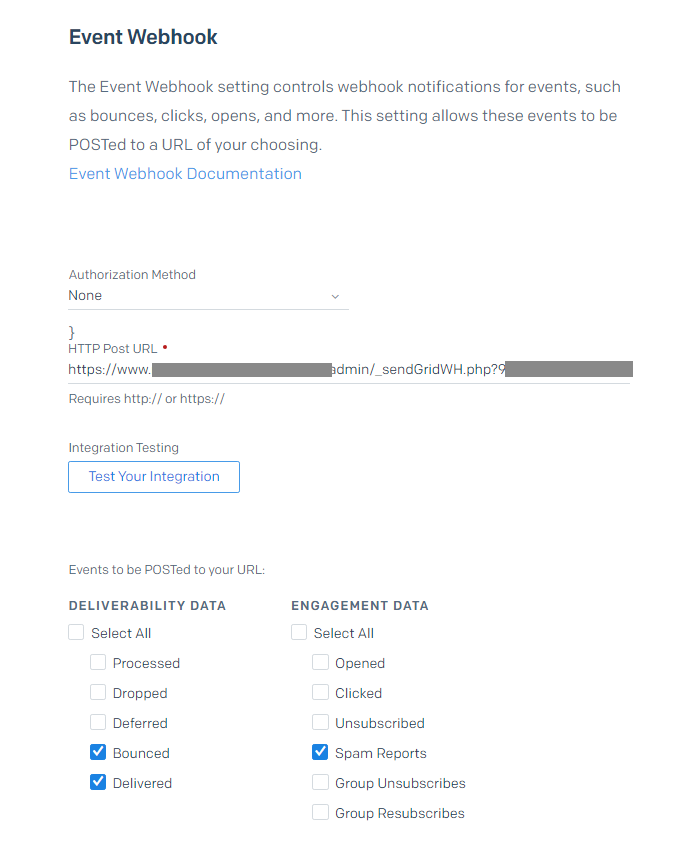
Then prepare your Webhook URL. That is:
https://www.yoursite.tld/admin/_sendGridWH.php?ApiKey
ApiKey is your administrator api key that you can copy from Menu > Configuration > Administrator.
Replace https://www.yoursite.tld with your own installation URL.
https://www.yoursite.tld/admin/_sendGridWH.php?ApiKey
ApiKey is your administrator api key that you can copy from Menu > Configuration > Administrator.
Replace https://www.yoursite.tld with your own installation URL.
Inside your SendGrid panel open "Settings" > "Mail Settings" and proceed as in the pictures below.
Enter your Webhook URL below:
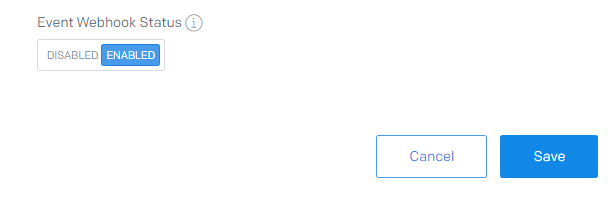
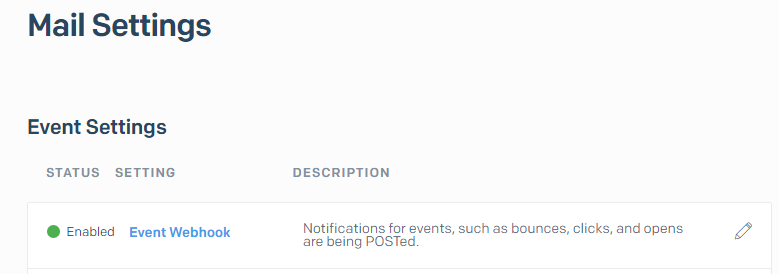
Enable the webhook:

MailJet webhooks If you use MailJet SMTP then you can set-up Webhooks in your MailJet panel and receive notifications for these two events: bounces and spam-report.
Add these custom headers to your MailJet smtp server:
X-Mailjet-Campaign=>[camp_id];
X-MJ-CustomID=>[sub_id];
The following applies to both SMTP and API methods.
Then prepare your Webhook URL. That is:
https://www.yoursite.tld/admin/_mailJetWH.php?ApiKey
ApiKey is your administrator api key that you can copy from Menu > Configuration > Administrator.
Replace https://www.yoursite.tld with your own installation URL.
https://www.yoursite.tld/admin/_mailJetWH.php?ApiKey
ApiKey is your administrator api key that you can copy from Menu > Configuration > Administrator.
Replace https://www.yoursite.tld with your own installation URL.
Inside your MailJet panel open your "Account settings" where you will see:
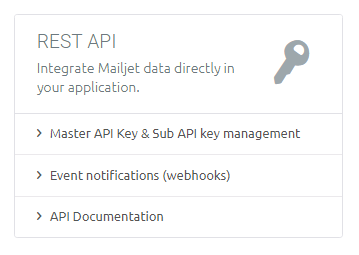
Click on Event notifications (webhooks)
Enter your Webhook URL like you see in the picture below:
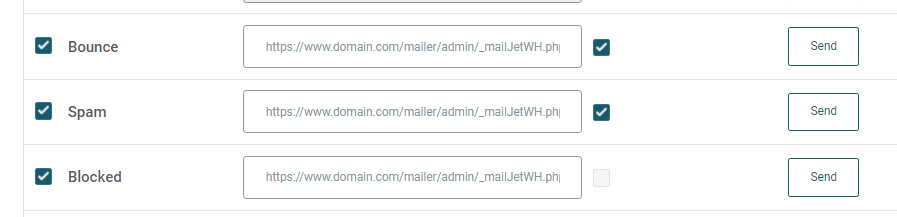
Enter your Webhook URL like you see in the picture below:
Smtp.com
If you use Smtp.com with the smtp method you can enable push notifications in the "Manage Senders" section of the SMTP Customer Portal.
(Changing Sender Notifications).
Add this custom header to your evoMailer smtp server that you setup for Smtp.com:
X-SMTPAPI=> {"unique_args": {"cmpID": "[camp_id]", "userID": "[sub_id]"}};The following applies to both SMTP and API methods.
Then prepare your Webhook URL. That is:
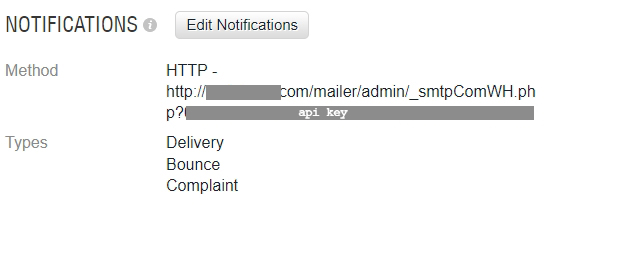
http://www.domain.com/mailer/admin/_smtpComWH.php?apiKey
Replace with your own domain, path and apiKey (from your evoMailer administrator account). Write it down.
http://www.domain.com/mailer/admin/_smtpComWH.php?apiKey
Replace with your own domain, path and apiKey (from your evoMailer administrator account). Write it down.
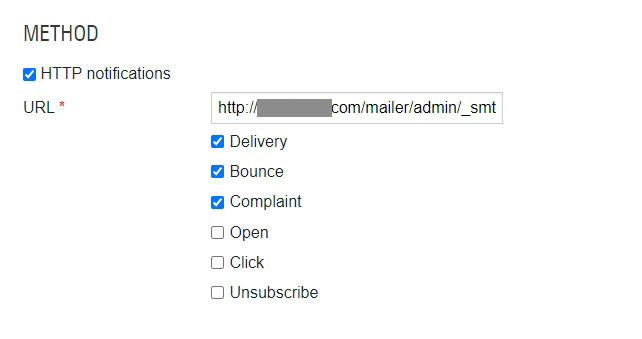
The events (also called triggers) for which to create notifications are Delivery, Bounce, Complaint.
Mailersend
If using the smtp method add this custom header to the related evoMailer smtp server
Webhook URL: http://www.domain.com/mailer/admin/_mailerSendWH.php?apiKey
Go to Domains >Manage
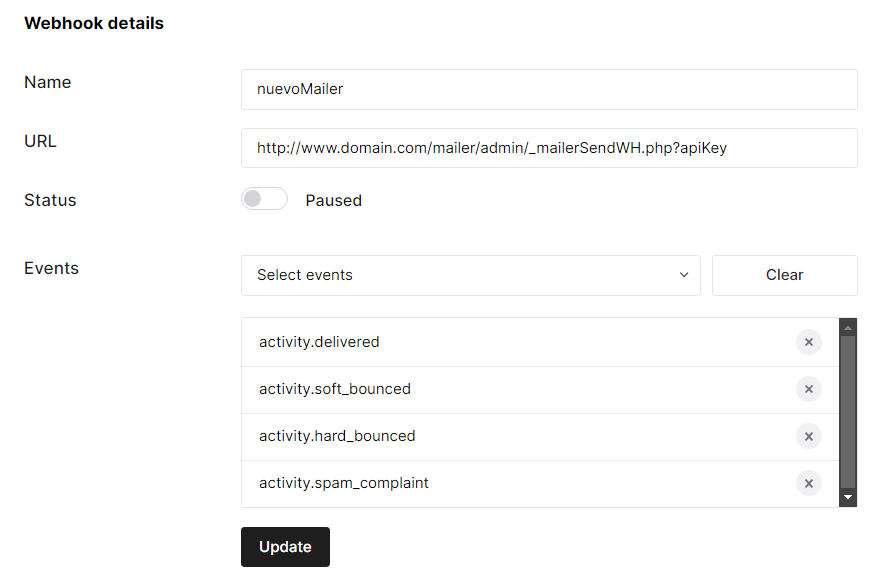
Replace with your own domain, path and apiKey (from your evoMailer administrator account).
Mandrill (Mailchimp) If using the smtp method add this custom header to the related nuevoMailer smtp server
Webhook URL: http://www.domain.com/mailer/admin/_mandrillWH.php?apiKey
Automations > Transactional emails > Launch app > Settings >Webhooks
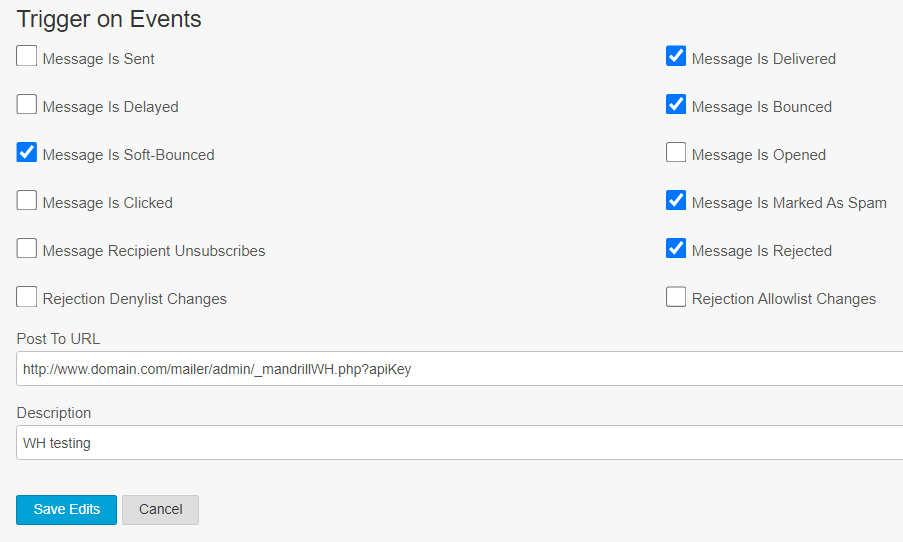
Replace with your own domain, path and apiKey (from your evoMailer administrator account).
Postmark
If using the smtp method add this custom header to the related evoMailer smtp server
Webhook URL: http://www.domain.com/mailer/admin/_postMarkWH.php?apiKey
Go to the server you have, click "Default Transactional Stream" then click Webhooks.
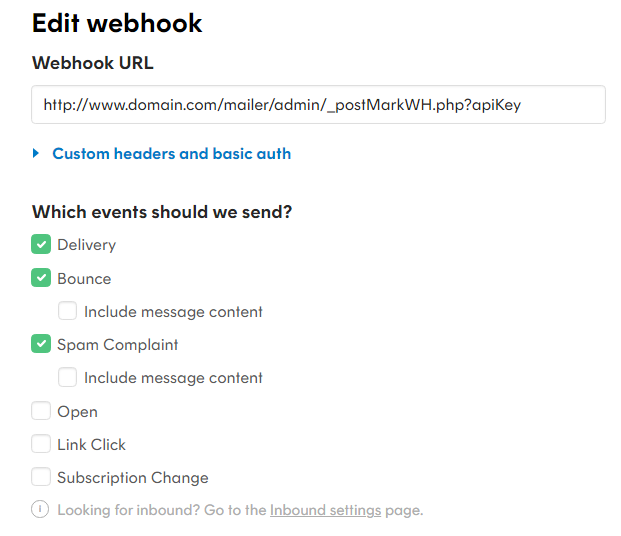
Replace with your own domain, path and apiKey (from your evoMailer administrator account).
Brevo (Sendinblue)
If using the smtp method add this custom header to the related evoMailer smtp server
Webhook URL: http://www.domain.com/mailer/admin/_brevoWH.php?apiKey
Click Transactional, Settings, Webhook.
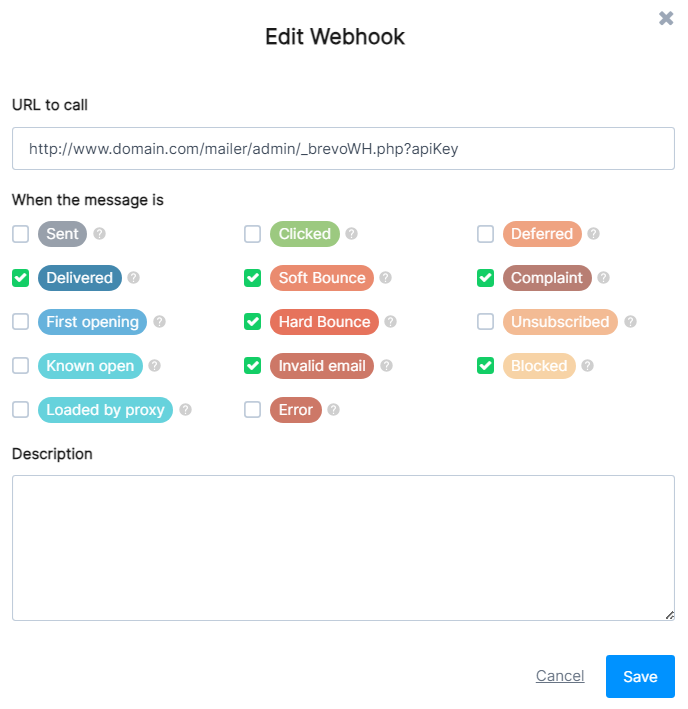
Replace with your own domain, path and apiKey (from your evoMailer administrator account).
Smtp2Go
Webhook URL: http://www.domain.com/mailer/admin/_smtp2GoWH.php?apiKey
Replace with your own domain, path and apiKey (from your evoMailer administrator account).
In the smtp server you created in evoMailer add these custom headers:
In your smtp2Go panel go to Settings > Webhooks and add a new Webhook.
Create/edit your webhook as you see here. Check the related checkboxes and also add the following values in the Headers box: campaign_id, recipient_id, group_id
Mailersend
If using the smtp method add this custom header to the related evoMailer smtp server
X-MC-Metadata=> { "recipient_id": "[sub_id]", "campaign_id": "[camp_id]", "group_id": "[group_id]"};The following applies to both SMTP and API methods.
Webhook URL: http://www.domain.com/mailer/admin/_mailerSendWH.php?apiKey
Go to Domains >Manage
Replace with your own domain, path and apiKey (from your evoMailer administrator account).
Mandrill (Mailchimp) If using the smtp method add this custom header to the related nuevoMailer smtp server
X-MC-Metadata=> { "recipient_id": "[sub_id]", "campaign_id": "[camp_id]", "group_id": "[group_id]"};The following applies to both SMTP and API methods.
Webhook URL: http://www.domain.com/mailer/admin/_mandrillWH.php?apiKey
Automations > Transactional emails > Launch app > Settings >Webhooks
Replace with your own domain, path and apiKey (from your evoMailer administrator account).
Postmark
If using the smtp method add this custom header to the related evoMailer smtp server
X-PM-Metadata-recipient_id=>[sub_id];
X-PM-Metadata-campaign_id=>[camp_id];
X-PM-Metadata-group_id=>[group_id];
X-PM-Message-Stream=> outbound;
The following applies to both SMTP and API methods.
Webhook URL: http://www.domain.com/mailer/admin/_postMarkWH.php?apiKey
Go to the server you have, click "Default Transactional Stream" then click Webhooks.
Replace with your own domain, path and apiKey (from your evoMailer administrator account).
Brevo (Sendinblue)
If using the smtp method add this custom header to the related evoMailer smtp server
X-Mailin-custom => {"recipient_id":"[sub_id]", "campaign_id":"[camp_id]", "group_id":"[group_id]"};The following applies to both SMTP and API methods.
Webhook URL: http://www.domain.com/mailer/admin/_brevoWH.php?apiKey
Click Transactional, Settings, Webhook.
Replace with your own domain, path and apiKey (from your evoMailer administrator account).
Smtp2Go
Webhook URL: http://www.domain.com/mailer/admin/_smtp2GoWH.php?apiKey
Replace with your own domain, path and apiKey (from your evoMailer administrator account).
In the smtp server you created in evoMailer add these custom headers:
recipient_id => [sub_id];
campaign_id => [camp_id];
group_id => [group_id];
In your smtp2Go panel go to Settings > Webhooks and add a new Webhook.
Create/edit your webhook as you see here. Check the related checkboxes and also add the following values in the Headers box: campaign_id, recipient_id, group_id